SQL Server Availability Groups in GCP using IP Alias Ranges
On a previous post I talked about how to create an Availability Group in GCP. One key requirement to make it work is to change the netmask of the guest OS to be broader than the GCP netmask (for example /16 in guest OS vs. /24 in GCP.) Then you need create routes for the IPs used by the WSFC and listener. Another simpler option is to use Alias IP Ranges which allows to assign a range of extra IPs to your instance. We only need two extra IPs (one for the WSFC and another for the Listener.) Right now Alias IP Ranges only supports /32 (1 IP) or /24 (254 IPs) for the secondary netmask. Because we need 2 IPs we will have to use /24. If you don’t mind the fact that you only use 2 IPs and the other 252 you will not use, then you can use this technique. Alias IP Ranges was intended to be used by containers, but it can also be used to create a SQL Server Availability Group.
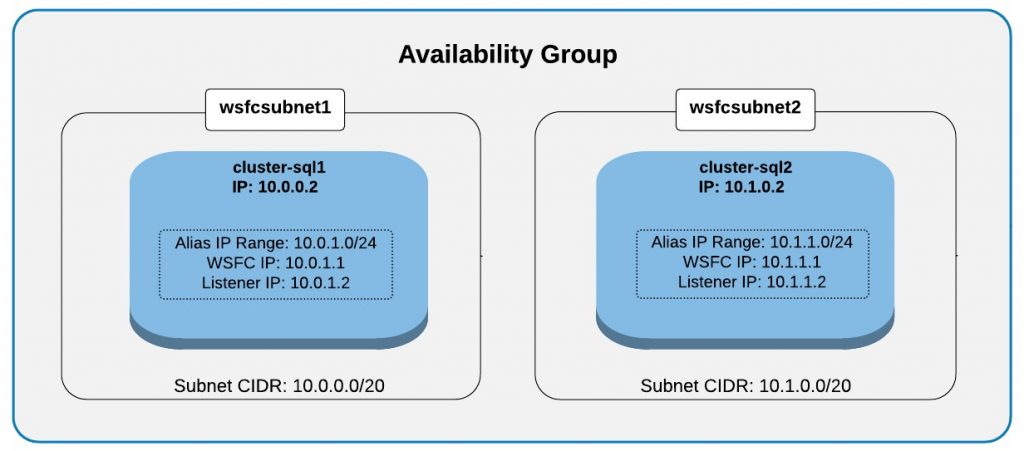
Below is a diagram on how the 2-node Availability Group is configured:
These are the steps to configure the Availability Group.
1. Create the VPC Network
We only need 2 subnets, but we create 3 to put our domain controller in a different subnet. Notice how the subnets have a /20 netmask (4,094 IPs). They need to be have enough IPs for the SQL node (1 IP in our example) plus the Alias IP range which has 254 IPs (/24) .
NOTE: We use region=us-east1 and zone=us-east1-b for the nodes, but you can change it to your preferred location. We also put the the domain controller (wsfcsubnet3) in us-east4. We are running these commands in a free account that has a limit of 8 CPUs per region and the two nodes need 4 CPUs each. But, for production loads you will probably want the domain controller in the same region as the SQL Server nodes.
|
1 2 3 4 |
gcloud compute networks create wsfcnet --subnet-mode custom gcloud compute networks subnets create wsfcsubnet1 --network wsfcnet --region us-east1 --range 10.0.0.0/20 gcloud compute networks subnets create wsfcsubnet2 --network wsfcnet --region us-east1 --range 10.1.0.0/20 gcloud compute networks subnets create wsfcsubnet3 --network wsfcnet --region us-east4 --range 10.2.0.0/24 |
2. Create the firewall rules
We want to allow all traffic between the subnets and we want to allow RDP connections. In this example we open RDP to the world (0.0.0.0/0) but you may want to change it to only allow your IP address.
|
1 2 |
gcloud compute firewall-rules create allow-internal-ports --network wsfcnet --allow tcp:1-65535,udp:1-65535,icmp --source-ranges 10.0.0.0/20,10.1.0.0/20,10.2.0.0/24 gcloud compute firewall-rules create allow-rdp --network wsfcnet --allow tcp:3389 --source-ranges 0.0.0.0/0 |
3. Create a domain controller
Create a new instance to be our domain controller. We like to keep the domain controller in a different subnet (wsfcsubnet3), but it is not absolutely necessary. Notice that boot-disk-type is set to pd-standard to save money during our demo, but pd-ssd is the recommended value.
|
1 |
gcloud compute instances create dc-windows --machine-type n1-standard-1 --boot-disk-type pd-standard --image-project windows-cloud --image-family windows-2012-r2 --boot-disk-size 200GB --zone us-east4-b --subnet wsfcsubnet3 --private-network-ip=10.2.0.100 |
Wait until the instance is configured by taking a look at the serial port output. You should press Ctrl-C once you see the text “Instance setup finished” to stop this command.
|
1 |
gcloud compute instances tail-serial-port-output dc-windows --zone us-east4-b |
Create a username/password for a user called “config-user.” This command will provide the information that you need to do an RDP connection.
|
1 |
gcloud compute reset-windows-password dc-windows --zone us-east4-b --user "config.user" --quiet |
4. Create a Windows AD Domain
Do an RDP connection to the new domain controller. Before running the command below, please assign a password to the local Administrator account or otherwise you will get an error. Then, open a PowerShell console is elevated mode and run the following command. It will prompt you to type the username and password used to logon to the instance (“config.user”). The name of the Windows domain that will be created is “dbeng.com.”
|
1 2 3 4 5 6 7 8 |
$DomainName = "dbeng.com"; $DomainMode = "Win2012R2"; $ForestMode = "Win2012R2"; $DatabasePath = "C:\Windows\NTDS"; $LogPath = "C:\Windows\NTDS"; $SysvolPath = "C:\Windows\SYSVOL"; Install-WindowsFeature -Name AD-Domain-Services -IncludeManagementTools; Install-ADDSForest -CreateDnsDelegation:$false -DatabasePath $DatabasePath -LogPath $LogPath -SysvolPath $SysvolPath -DomainName $DomainName -DomainMode $DomainMode -ForestMode $ForestMode -InstallDNS:$true -NoRebootOnCompletion:$false -SafeModeAdministratorPassword ((Get-Credential).Password) -Force:$true; |
After the computer restarts, logon again to verify that the Domain administrator password works which should be the password previously assigned to the local Administrator.
5. Create two SQL Server instances
When creating the two instances we set the boot-disk-type to pd-standard to save money in our test, but pd-ssd is the recommended value. We also use an image with SQL Server 2016 Standard on Windows 2016 . You can run the command gcloud compute images list to see a list of all the SQL Server images under the project windows-sql-cloud. We also use n1-standard-4 for machine-type but for production you may want to use a “highmem” machine type (run gcloud compute machine-types list). Pay attention to the parameter network-interface as it is critical to type the correct subnet, private network and alias IP.
|
1 2 |
gcloud compute instances create cluster-sql1 --machine-type n1-standard-4 --boot-disk-type pd-standard --boot-disk-size 200GB --image-project windows-sql-cloud --image-family sql-std-2016-win-2016 --zone us-east1-b --network-interface subnet=wsfcsubnet1,private-network-ip=10.0.0.4,aliases=10.0.1.0/24 --metadata sysprep-specialize-script-ps1="Install-WindowsFeature Failover-Clustering -IncludeManagementTools;" gcloud compute instances create cluster-sql2 --machine-type n1-standard-4 --boot-disk-type pd-standard --boot-disk-size 200GB --image-project windows-sql-cloud --image-family sql-std-2016-win-2016 --zone us-east1-b --network-interface subnet=wsfcsubnet2,private-network-ip=10.1.0.4,aliases=10.1.1.0/24 --metadata sysprep-specialize-script-ps1="Install-WindowsFeature Failover-Clustering -IncludeManagementTools;" |
Wait until the instances are configured. Press Ctrl-C once you see the text “Instance setup finished” to stop this command.
|
1 2 |
gcloud compute instances tail-serial-port-output cluster-sql1 --zone us-east1-b gcloud compute instances tail-serial-port-output cluster-sql2 --zone us-east1-b |
Create a username/password for a user called “config-user.”
|
1 2 |
gcloud compute reset-windows-password cluster-sql1 --zone us-east1-b --user "config.user" --quiet gcloud compute reset-windows-password cluster-sql2 --zone us-east1-b --user "config.user" --quiet |
6. Configure Windows firewall and add servers to the domain
In both nodes: Do an RDP connection using the login config.user. Open a PowerShell console in elevated mode to run these commands. They will change the DNS server to be the domain controller, open the firewall ports for SQL Server and Availability Groups, and add the servers to the domain. When prompted type the password for the domain administrator.
|
1 2 3 4 |
Set-DnsClientServerAddress -InterfaceAlias "Ethernet" -ServerAddresses "10.2.0.100"; New-NetFirewallRule -DisplayName "Open Port 5022 for Availability Groups" -Direction Inbound -LocalPort 5022 -Protocol TCP; New-NetFirewallRule -DisplayName "Open Port 1433 for SQL Server" -Direction Inbound -LocalPort 1433 -Protocol TCP; Add-Computer -DomainName "dbeng.com" -Credential "dbeng.com\Administrator" -Restart -Force; |
The servers will restart. Do an RDP connection again but this time log on as domain administrator.
7. Create a Windows Server Failover Cluster (WSFC)
Only in Node 1:
Open a PowerShell console in elevated mode to run these commands. Make sure you provide the correct IP adddress for the WSFC. It has to be an address within the IP Alias range in each node.
|
1 2 3 4 5 6 7 8 9 10 11 |
# Names of nodes and name/IP addresses of cluster $node1 = "cluster-sql1"; $node2 = "cluster-sql2"; $nameWSFC = "cluster-dbclus" # Name of cluster $ipWSFC1 = "10.0.1.1" # IP address of cluster in subnet 1 $ipWSFC2 = "10.1.1.1" # IP address of cluster in subnet 2 # Create cluster New-Cluster -Name $nameWSFC -Node $node1, $node2 -NoStorage -StaticAddress $ipWSFC1,$ipWSFC2; # Enable Always-On on both nodes Enable-SqlAlwaysOn -ServerInstance $node1 -Force; Enable-SqlAlwaysOn -ServerInstance $node2 -Force; |
8. Create a folder for the database backups
Only in Node 2:
Open a PowerShell console in elevated mode to run these commands. We create a folder in Node 2 to store the backups for the initial synchronization. This could also be a network share.
|
1 2 |
New-item -ItemType Directory "C:\SQLBackup"; New-SMBShare –Name "SQLBackup" –Path "C:\SQLBackup" –FullAccess "$domain\authenticated users"; |
9. Create folders for the database data and log files
Both nodes:
Run these commands in PowerShell. They create the folders for the data and transaction log for the database.
|
1 2 |
New-item -ItemType Directory "C:\SQLData"; New-item -ItemType Directory "C:\SQLLog"; |
10. Create the Test database
Only in Node 1:
Run this command in PowerShell. It will create a TestDB database in Node 1.
|
1 2 3 4 5 6 7 8 9 10 11 |
Invoke-Sqlcmd -Query " ` CREATE DATABASE TestDB ` ON PRIMARY (NAME = 'TestDB_Data', FILENAME='C:\SQLData\TestDB_Data.mdf', SIZE = 256MB, MAXSIZE = UNLIMITED, FILEGROWTH = 256MB ) ` LOG ON (NAME = 'TestDB_Log', FILENAME='C:\SQLLog\TestDB_Log.ldf', SIZE = 256MB, MAXSIZE = UNLIMITED, FILEGROWTH = 256MB ) ` GO ` USE [TestDB] ` Exec dbo.sp_changedbowner @loginame = 'sa', @map = false; ` ALTER DATABASE [TestDB] SET RECOVERY FULL; ` GO" |
11. Create Endpoint in Node 1
Only in Node 1:
Create an endpoint in Node 1 and grant connect permission to the remote node (Node 2).
|
1 2 3 4 5 6 7 8 9 10 11 12 13 14 15 16 17 18 19 20 21 22 23 |
$hostname = "cluster-sql1"; $remote_node = "dbeng\cluster-sql2`$"; $endpoint = New-SqlHadrEndpoint "Hadr_endpoint" ` -Port 5022 ` -Path "SQLSERVER:\SQL\$hostname\Default"; Set-SqlHadrEndpoint -InputObject $endpoint -State "Started"; # Grant connect permissions to the endpoint $query = " ` IF SUSER_ID('$remote_node') IS NULL CREATE LOGIN [$remote_node] FROM WINDOWS ` GO GRANT CONNECT ON ENDPOINT::[Hadr_endpoint] TO [$remote_node] ` GO ` IF EXISTS(SELECT * FROM sys.server_event_sessions WHERE name='AlwaysOn_health') ` BEGIN ` ALTER EVENT SESSION [AlwaysOn_health] ON SERVER WITH (STARTUP_STATE=ON); ` END ` IF NOT EXISTS(SELECT * FROM sys.dm_xe_sessions WHERE name='AlwaysOn_health') ` BEGIN ` ALTER EVENT SESSION [AlwaysOn_health] ON SERVER STATE=START; ` END ` GO"; Write-Host $query; Invoke-Sqlcmd -Query $query; |
12. Create Endpoint in Node 2
Only in Node 2:
Create an endpoint in Node 2 and grant connect permission to the remote node (Node 1).
|
1 2 3 4 5 6 7 8 9 10 11 12 13 14 15 16 17 18 19 20 21 22 23 |
$hostname = "cluster-sql2"; $remote_node = "dbeng\cluster-sql1`$"; $endpoint = New-SqlHadrEndpoint "Hadr_endpoint" ` -Port 5022 ` -Path "SQLSERVER:\SQL\$hostname\Default"; Set-SqlHadrEndpoint -InputObject $endpoint -State "Started"; # Grant connect permissions to the endpoint $query = " ` IF SUSER_ID('$remote_node') IS NULL CREATE LOGIN [$remote_node] FROM WINDOWS ` GO GRANT CONNECT ON ENDPOINT::[Hadr_endpoint] TO [$remote_node] ` GO ` IF EXISTS(SELECT * FROM sys.server_event_sessions WHERE name='AlwaysOn_health') ` BEGIN ` ALTER EVENT SESSION [AlwaysOn_health] ON SERVER WITH (STARTUP_STATE=ON); ` END ` IF NOT EXISTS(SELECT * FROM sys.dm_xe_sessions WHERE name='AlwaysOn_health') ` BEGIN ` ALTER EVENT SESSION [AlwaysOn_health] ON SERVER STATE=START; ` END ` GO"; Write-Host $query; Invoke-Sqlcmd -Query $query; |
13. Create the Availability Group
Only in Node 1:
The following PowerShell commands will create the Availability Group. It is very important to provide the correct IP for the listener in both nodes. It has to be an IP address within the range of the IP Alias. You should run these commands one at a time in case you get any errors.
|
1 2 3 4 5 6 7 8 9 10 11 12 13 14 15 16 17 18 19 20 21 22 23 24 25 26 27 28 29 30 31 32 33 34 35 36 37 38 39 40 41 42 43 44 45 46 47 48 49 50 51 52 53 54 55 56 57 58 59 60 61 62 63 64 65 66 67 68 69 70 71 72 73 |
$node1 = "cluster-sql1"; $node2 = "cluster-sql2"; $domain = "dbeng.com"; $share_name = "SQLBackup"; $db_name = "TestDB"; $ip_ag_listener1 = "10.0.1.2"; $ip_ag_listener2 = "10.1.1.2"; $name_ag = "cluster-ag"; $name_ag_listener= "ag-listener"; # Backup DB and Transaction Log $backupDB = "\\$node2\$share_name\$($db_name)_db.bak"; Backup-SqlDatabase ` -Database $db_name ` -BackupFile $backupDB ` -ServerInstance $node1 ` -Initialize; $backupLog = "\\$node2\$share_name\$($db_name)_log.bak"; Backup-SqlDatabase ` -Database $db_name ` -BackupFile $backupLog ` -ServerInstance $node1 ` -BackupAction Log -Initialize; # Restore the database and log on the secondary (using NO RECOVERY) Restore-SqlDatabase ` -Database $db_name ` -BackupFile $backupDB ` -ServerInstance $node2 ` -NoRecovery -ReplaceDatabase; Restore-SqlDatabase ` -Database $db_name ` -BackupFile $backupLog ` -ServerInstance $node2 ` -RestoreAction Log ` -NoRecovery; # Find the version of SQL Server that Node 1 is running $Srv = Get-Item SQLSERVER:\SQL\$($node1)\DEFAULT; $Version = ($Srv.Version); # Create an in-memory representation of the primary replica $primaryReplica = New-SqlAvailabilityReplica ` -Name $node1 ` -EndpointURL "TCP://$($node1).$($domain):5022" ` -AvailabilityMode SynchronousCommit ` -FailoverMode Automatic ` -Version $Version ` -AsTemplate; # Create an in-memory representation of the secondary replica $secondaryReplica = New-SqlAvailabilityReplica ` -Name $node2 ` -EndpointURL "TCP://$($node2).$($domain):5022" ` -AvailabilityMode SynchronousCommit ` -FailoverMode Automatic ` -Version $Version ` -AsTemplate; # Create the availability group New-SqlAvailabilityGroup ` -Name $name_ag ` -Path "SQLSERVER:\SQL\$($node1)\DEFAULT" ` -AvailabilityReplica @($primaryReplica,$secondaryReplica) ` -Database $db_name; # Join the secondary replica to the availability group Join-SqlAvailabilityGroup ` -Path "SQLSERVER:\SQL\$($node2)\DEFAULT" ` -Name $name_ag; # Join the secondary database to the availability group Add-SqlAvailabilityDatabase ` -Path "SQLSERVER:\SQL\$($node2)\DEFAULT\AvailabilityGroups\$($name_ag)" ` -Database $db_name; # Create the listener New-SqlAvailabilityGroupListener ` -Name $name_ag_listener ` -StaticIp "$($ip_ag_listener1)/255.255.0.0","$($ip_ag_listener2)/255.255.0.0" ` -Path SQLSERVER:\SQL\$($node1)\DEFAULT\AvailabilityGroups\$($name_ag) | Format-Table; |
14. Test your Availability Group
You should now be ready to test the Availability Group. If you followed these instructions, you can use “ag-listener” as the name of the SQL Server when testing your Availability Group.